Hey folks, I'm back with some instrument modifications I've done. I won't say much cause I've got vids for it all, but the gist of it is this:
My band has a few songs that could use a cello or viola parts, and seeing as we are a 3piece, it is kinda hard to work that in. So having a Rogue sx100b laying around in the garage and a violin bow, I decided to mess around, the results have been mixed, but I'm happy with what I got out of it. 4 vids from start to finish, enjoy.
Since then I've modified it further, but that's for another post. Lemme know what you think!

Wednesday, September 29, 2010
Sunday, September 26, 2010
Darkness is Back - Live at "The Next Bar" 9/23/10
Hey folks got another vid up, this one is one of my favorite to play, as well as to listen to, so check it out and tell me what you think! You can see the rest at my bands youtube channel: http://www.youtube.com/user/TheLongBlackVeils you can also find us on Myspace: http://www.myspace.com/thelongblackveils
Facebook: http://www.facebook.com/pages/The-Long-Black-Veils/112452882135111
And even Twitter: http://twitter.com/thelbv
Facebook: http://www.facebook.com/pages/The-Long-Black-Veils/112452882135111
And even Twitter: http://twitter.com/thelbv
Saturday, September 25, 2010
Country Song #1 - Live at "The Next Bar" 9/23/10
For all of you that made it out, Thanks!! For those that didn't, here's a vid from My band's (The Long Black Veils) show 9-23-10 at The Next Bar in Fresno, Ca. I'll have some full blogs up soon (Vivi!!) but I'm dead tired from fishing and rocking the house and having a family, this week has been hectic!!!
Tuesday, September 21, 2010
...and then you shellac him real good!
Hey folks, quick post here about PAPERCRAFT!
I've been told of this thing called "Decoupage" , which is also a form of paper art:
http://en.wikipedia.org/wiki/Decoupage
Which got me thinking, My papercraft link is pretty fragile, mayhaps I should shore him up with some sort of lacquer type substance stuff. So here you go:


I took him out to the garage, impaled him like Vlad (well, he's got openings in the bottom so not really, but it looks like it XD) and sprayed him with the Polyurethane I bought when I was refinishing a table. This particular kind of spray varnish has a flat spraying nozzle, I don't know about other brands, but it works perfectly.
I simply sprayed him in even coats the way you would any other surface, making sure to get the crevices and such, making sure not to soak him down, and let him sit to dry. He came out pretty good in my opinion:


Now, I used semi-gloss spray, because that's what I had in my garage. If I was buying it specifically for papercraft models I would prefer matte (no gloss, less shiny). The end result is a sturdier, more resilient model that will last longer. I'm going to go back out and add a few more coats to further reinforce the model, letting him dry after each coat. I anticipate it will strengthen the model and, in my case because of the semi-gloss spray, make him even shinier.
Let me know if you try this method or know someone who does, I'm always looking for tips to make my papercraft better and to share here for others!
Friday, September 17, 2010
Make your own Papercraft!!
Hey folks!
I'm back with some SUPERB info for all you papercraft fans!!!
Papercraft is art, but even more so, its logic. The bends, the folds, the dimensions, its all quantifiable in terms of geometry. So who gives a damn? Not this highschool dropout! But it is an interesting part of the hobby, so lets give it a minute to shine eh?
Any object in real life can be broken down into dimensions, width, height, angle, area, circumference, etc. What happens with 3D imaging is that all these dimensions are input into a PC program and a model is created. Now animation aside, you can get away with very few dimensions on almost any object in real life.
Take a Cube, it has 6 sides (not counting "indside" and "outside" of course)
, top-bottom-left-right-front-back. This is the realization of the image of a box in 3D. But in terms of papercraft, it becomes a tad more complicated. It becomes a cross of squares with tabs to glue to the sides. Example "companion cube" from the "portal" games (btw, the cake isn't a lie):

 Now the cube at the bottom is a more complicated version, but you get the idea.
Now, you might be content with downloading and buying your papercraft model plans from premade sources, but if you're like me, you'll eventually want your own creations, and I'm here to tell you how to do that!
First of all, you need a few programs. How you get them is up to you, some are free, some are not, but I'm not going to tell you what to buy or what to download.....legally of course. What I will tell you are the programs that I use.
Blender and Pepakura. Blender is a 3D modeling program that you can use to render any object you can create into 3D models for export in various formats. Pepakura is a papercraft specific program that unfolds your 3D models and lets you print them out just like you print out your downloaded papercraft models. I've found through my limited experience that these are FREAKING AWESOME programs for papercrafters.
I've found a few tutorials for Pepakura on youtube, most of them suck, but there was one pretty good one:
This tutorial wont give you step by step directions, but I've found with Pepakura you won't really need them, most of the help you need you'll find on the Pepakura website HERE, and this vid will show you the extreme possibilities inherent in the hobby.
Now Blender, its a bit more complicated. It's a full on 3D rendering program. You can use it to make animations, prototypes for products, papercraft models, or anything else you can imagine that's in 3D. I can't understate this, IT'S FREAKING AWESOME, but it's a lot more difficult to use, and it's the way you make your models SO LEARN IT! That being said, I've found some really kickass tutorials from this great guy super3boy on youtube, check his channel HERE. Here is the first of the Blender tutorials from super3:
So basically, you use blender to create a 3D model (say the companion cube) then save the file, then you use pepakura to open the file you just created, and it will "unfold" the 3D model and turn it into a printout (like the "cross of squares") that you can print, cut, and build. :)
Now you have the info you need to get the tools for creation, so create! I'd love it if anyone who creates a papercraft with these would send the files to me. Email me at Zombie_slag@basslayer.cc.
I'm back with some SUPERB info for all you papercraft fans!!!
Papercraft is art, but even more so, its logic. The bends, the folds, the dimensions, its all quantifiable in terms of geometry. So who gives a damn? Not this highschool dropout! But it is an interesting part of the hobby, so lets give it a minute to shine eh?
Any object in real life can be broken down into dimensions, width, height, angle, area, circumference, etc. What happens with 3D imaging is that all these dimensions are input into a PC program and a model is created. Now animation aside, you can get away with very few dimensions on almost any object in real life.
Take a Cube, it has 6 sides (not counting "indside" and "outside" of course)
, top-bottom-left-right-front-back. This is the realization of the image of a box in 3D. But in terms of papercraft, it becomes a tad more complicated. It becomes a cross of squares with tabs to glue to the sides. Example "companion cube" from the "portal" games (btw, the cake isn't a lie):


Now, you might be content with downloading and buying your papercraft model plans from premade sources, but if you're like me, you'll eventually want your own creations, and I'm here to tell you how to do that!
First of all, you need a few programs. How you get them is up to you, some are free, some are not, but I'm not going to tell you what to buy or what to download.....legally of course. What I will tell you are the programs that I use.
Blender and Pepakura. Blender is a 3D modeling program that you can use to render any object you can create into 3D models for export in various formats. Pepakura is a papercraft specific program that unfolds your 3D models and lets you print them out just like you print out your downloaded papercraft models. I've found through my limited experience that these are FREAKING AWESOME programs for papercrafters.
I've found a few tutorials for Pepakura on youtube, most of them suck, but there was one pretty good one:
This tutorial wont give you step by step directions, but I've found with Pepakura you won't really need them, most of the help you need you'll find on the Pepakura website HERE, and this vid will show you the extreme possibilities inherent in the hobby.
Now Blender, its a bit more complicated. It's a full on 3D rendering program. You can use it to make animations, prototypes for products, papercraft models, or anything else you can imagine that's in 3D. I can't understate this, IT'S FREAKING AWESOME, but it's a lot more difficult to use, and it's the way you make your models SO LEARN IT! That being said, I've found some really kickass tutorials from this great guy super3boy on youtube, check his channel HERE. Here is the first of the Blender tutorials from super3:
So basically, you use blender to create a 3D model (say the companion cube) then save the file, then you use pepakura to open the file you just created, and it will "unfold" the 3D model and turn it into a printout (like the "cross of squares") that you can print, cut, and build. :)
Now you have the info you need to get the tools for creation, so create! I'd love it if anyone who creates a papercraft with these would send the files to me. Email me at Zombie_slag@basslayer.cc.
Wednesday, September 15, 2010
Music to dance to!
Hey folks!
Time for that "something special" I mentioned the other day. If you read my "about me" section you know I'm the bassist for a band called "The Long Black Veils". Well, here's the links to our myspace, twitter, facebook, and even youtube!
We played our first live show at a house party out in the country a few months ago and it went great, you can see the pics all over the myspace and facebook pages. Then our drummer had surgery so we went on a break (and cleaned out the Otter House, drank lots of beers and had a few bbq's lol).
But last week our singer Rob Avalos had the opportunity to open up for friends of ours Sunconscious Fountain at The Next Bar and we had a great time! It was great to be a part of the crowd, drinking and cheering, I usually don't get to be on that side of the stage so it was really cool.
Here's some pics!
There's more pics on the facebook\myspace and heres a vid from the Youtube channel. This is Rob warming up outside while the P.A. is being set up.
It was an awesome night and we will be heading back as soon as we can as a full band (maybe even putting our drummer on acoustic guitar if he's not recovered yet? Who knows!) So check out my band, check out our sites, listen to the music, and please leave comments, follow us on twitter, like us on facebook, be our friends of myspace, rate and comment our vids on youtube and all that stuff!
K time to get some work done on my ViVi papercraft!
Time for that "something special" I mentioned the other day. If you read my "about me" section you know I'm the bassist for a band called "The Long Black Veils". Well, here's the links to our myspace, twitter, facebook, and even youtube!
We played our first live show at a house party out in the country a few months ago and it went great, you can see the pics all over the myspace and facebook pages. Then our drummer had surgery so we went on a break (and cleaned out the Otter House, drank lots of beers and had a few bbq's lol).
But last week our singer Rob Avalos had the opportunity to open up for friends of ours Sunconscious Fountain at The Next Bar and we had a great time! It was great to be a part of the crowd, drinking and cheering, I usually don't get to be on that side of the stage so it was really cool.
Here's some pics!
 |
| Rob tearin it up onstage! |
 |
| Subconscious Fountain bringin it home |
It was an awesome night and we will be heading back as soon as we can as a full band (maybe even putting our drummer on acoustic guitar if he's not recovered yet? Who knows!) So check out my band, check out our sites, listen to the music, and please leave comments, follow us on twitter, like us on facebook, be our friends of myspace, rate and comment our vids on youtube and all that stuff!
K time to get some work done on my ViVi papercraft!
Sunday, September 12, 2010
Vivi Papercraft update
Hey folks!
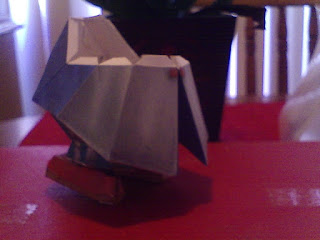
I'm back in black and at it again, Working on my Papercraft before goin to band practice! I've got a pic update of my progress on the Vivi model I've been working on and a few tips that I've thought of as i've been working today. First, Vivi update:


I'm back in black and at it again, Working on my Papercraft before goin to band practice! I've got a pic update of my progress on the Vivi model I've been working on and a few tips that I've thought of as i've been working today. First, Vivi update:


Got the bottom of the jacket, lemme tell you that took a bit of patience!

Then another piece just above that, this model has tons of pieces!
Okay, I'm still working on it currently (like right now I'm blogging this while waiting for glue to dry!) but I noticed some things that I can share with you all.
TIP TIME!
1: Cut carefully!! Now this may be a no-duh tip, but you'll be surprised how little it takes to screw something up. Here's my example:

Now that's frustrating! As you can see, there are no other white lines on the bottom half of the model, just that one spot. That came from being distracted and angling my blade the wrong way. When you cut a piece, you should angle your blade slightly away from the piece.
 |
| This is the angle you want to cut at, tilting the blade AWAY from the piece. |
This way the blade is cutting in and UNDER the piece, so if you do screw up by a micromillimeter it wont be bad because you wont be exposing the white paper under the ink of the piece. You can cut straight down also, but I find that its easier to stay exactly along the edge of the piece if you cut at an angle. For your reference, and cause I took the pics:
 | |
| Straight |
 |
| Wrong! This is how I screwed up the piece in the top pic. |
It will just make your models cleaner and save you from disappointment overall.
Tip 2: Glue an anchor, then wait!
Most models go in sections, some of them large, some insanely small and delicate, either way, the best way to keep control of the model and get everything aligned is to glue an anchor and wait.
Start with the center or one edge of the piece, glue it, let it dry, and then you will have a much easier time gluing the subsequent tabs on that piece. It's a pain in the butt to wrestle an entire piece trying to glue multiple tabs. It exercises your patience, but trust me, its the best way to go.
Tip 3: Reinforce!!
Paper, even cardstock, isn't the sturdiest medium to work with, and it can fall apart. To make your models last, you should reinforce the weakest points, obviously the points where its glued together. Whenever your done gluing a piece in its entirety, simply take your toothpick and glue and put a layer on the INSIDE of the model, coating the joints and effectively reinforcing your model. Depending on what stock your using you'll use more or less glue to reinforce. On regular A4 use very little, on cardstock you can be a bit more generous without compromising the paper.
Tip 4: Relax!!
I know how stupid that sounds, but just take it from me, you wanna have fun and be relaxed for this, just like any other hobby. If you're the type that likes to focus and zone out to relax, go ahead and hit it stressed. If you're anything like me, you wanna be relaxed enough to focus and zone out before you hit it. Personally I stick some blues (Son House and Johnny Winter FTW!) on Pandora radio, brew a pot of coffee, clear the kitchen table and go into my own little world.
Thanks again for reading and I hope you get some use out of these tips. As always remember to check paperkraft.net for more awesome models (seriously, those guys have the best stuff) and pretty please leave me some comments :D
Thanks again for reading and I hope you get some use out of these tips. As always remember to check paperkraft.net for more awesome models (seriously, those guys have the best stuff) and pretty please leave me some comments :D
Thursday, September 9, 2010
New phone yay!
I got a new phone! So now I can take pics and vids even if I forget my nifty polaroid dvf130.
See, told you guys I'd blog about whatever the hell I feel like talking about :)
Yeah I know, you all have iPhails or Droids, good for you, but I'm poor, so I'm excited for my qwerty keypad, mp3 via bluetooth, and other nifty whatnots. Hopefully I'll get a data plan eventually (blog from phone?) but for now I'm happy. :) see, smiley face means happy :)
 I have the black one and wifey got the purple. Samsung Strive. Love this phone!! The only bad thing I can say about it is that there is no 3.5mm jack, which is annoying in this day and age of interconnection. I should be able to load my phone with mp3s and jack it into my car stereo, but alas, no such luck. But I can listen to my music via the extraordinarily loud speaker on the phone itself or bluetooth headset, which is nice on those early morning fishing trips or when I'm doing my papercraft and the wife has the TV on Buffy and that damdedly loud theme song comes on, which is a daily occurance. Buffy I mean, not papercraft, that's weekly or so.
Also, for a 2mp camera it takes surprisingly good pictures and video, and with a converter http://www.nchsoftware.com/prism/index.html you can easily convert videos from and to the .3gp format the phone uses. I've got the last half of Naruto season 6 on my phone for when I'm stuck in line or at a dinner or something.
Here's a pic of my youngest for your viewing enjoyment
 Pretty decent quality for a phone right? And thats in multishot mode which means its only 320X240, it goes up to 1600X1200 for single shot mode.
Well that's it for today. Gunna have something special up over the next few days (maybe even tomorrow!) so be on the lookout.
See, told you guys I'd blog about whatever the hell I feel like talking about :)
Yeah I know, you all have iPhails or Droids, good for you, but I'm poor, so I'm excited for my qwerty keypad, mp3 via bluetooth, and other nifty whatnots. Hopefully I'll get a data plan eventually (blog from phone?) but for now I'm happy. :) see, smiley face means happy :)
Also, for a 2mp camera it takes surprisingly good pictures and video, and with a converter http://www.nchsoftware.com/prism/index.html you can easily convert videos from and to the .3gp format the phone uses. I've got the last half of Naruto season 6 on my phone for when I'm stuck in line or at a dinner or something.
Here's a pic of my youngest for your viewing enjoyment

Well that's it for today. Gunna have something special up over the next few days (maybe even tomorrow!) so be on the lookout.
Subscribe to:
Posts (Atom)